
Mummy Oreo Truffles For A Spooktacular Halloween Delicacy!
Every Halloween brings an opportunity to explore culinary creativity. Crafting Mummy Oreo Truffles has established itself as a cherished tradition for the spooky festivities.
Check out this list of Halloween Candy Recipes and Halloween Puff Pastry Recipes to go with this Halloween Worm Dirt Frosting Board.

These delectable and visually striking truffles are a Halloween party essential. They are captivating to both young and old with their playful and spooky demeanor.
Creating these festive treats is a breeze, requiring only Oreos, cream cheese, and white chocolate for a silky coating. It’s an uncomplicated, no-bake concoction that’s a joy to create.
The process is straightforward—crushing Oreos, mixing them with cream cheese, and shaping the mixture into balls. Finally, immerse them in melted white chocolate.
A pair of chocolate chip eyes breathe life into the Mummy Oreo Truffles, making them the star of any Halloween bash. For more Oreo recipes, check out those Rudolph Oreo balls, Oreo cookie pops, or deep-fried Oreo ice cream.
Why You’ll Love This Mummy Oreo Truffles Recipe
You’re bound to fall in love with this recipe due to its uncomplicated charm and delightful taste!
The blend of crunchy Oreos with creamy cream cheese, all wrapped in smooth white chocolate, delivers a mouthful of happiness with every bite.
The recipe invites creativity and playfulness, allowing you to design each truffle. It is a fun and personal touch to your Halloween celebrations.
It’s a joyful experience that goes beyond simple cooking and into a world of culinary artistry, suitable for everyone, young and old.

Ingredients
When I make Mummy Oreo Truffles, I start by gathering the essential ingredients. These are Oreos, cream cheese, and white chocolate. To create that spooky mummy look, I use white candy melts and candy eyeballs.
- Oreos: I prefer to use the original Oreos for this recipe. It’s better to avoid the Double-Stuffed Oreos as they won’t hold together as well. Golden Oreos are also an option if you want a different flavor.
- Cream Cheese: For a creamier truffle, I use 8 oz of cream cheese softened to room temperature. It’s crucial to let the cream cheese soften before use, or it will be challenging to mix with the crushed Oreos.
- White Chocolate: I find that melting white chocolate or almond bark works well for coating the Oreo truffles. It gives them a nice smooth appearance. However, you can also use white candy melts if you prefer a more stable and easier-to-melt option.
Here is a guide to help you melt your white chocolate.
Now here are some additional ingredients that can complete the look and taste of these Mummy Oreo Truffles:
- Candy Eye Balls: These are tiny sugar decorations that add character to the truffles, giving them a more mummy-like appearance.
- Food Coloring: If you want to add a touch of color to your truffles, you can use food coloring in the white chocolate or candy melts. However, do note that it’s not essential for the recipe.
- Salt (optional): A pinch of salt added to the Oreo and cream cheese mixture can balance the sweetness.

Although other ingredients may be added based on personal preference, the options mentioned above are a great starting point. With these ingredients, I can create cute, tasty, and spooky Mummy Oreo Truffles perfect for Halloween festivities!
Preparation Steps
I’m excited to share how simple it is to make Mummy Oreo Truffles! Here are the preparation steps to make this delightful treat.
Crush the Oreos using a food processor until they reach a wet sand-like consistency.

Then, add some softened cream cheese and mix it with the crushed Oreos until they are well combined.

Now, take a cookie scoop or spoon and roll the Oreo mixture into 1-inch balls. Place these balls on a large, lined sheet pan.

Once all the Oreo balls are prepared, give each one a final gentle roll with your hands into a nicely rounded shape. Then refrigerate them for about 10 minutes to firm up. This step will make them easier to handle during the coating process.

While the Oreo balls are chilling, we can get our white chocolate ready for coating. Melt white chocolate chips or candy coating in a microwave-safe bowl, following the package directions.

It’s essential to have a smooth and melted consistency for a simple even coating. Set some chocolate aside to drizzle later. After the Oreo balls have chilled and the white chocolate is ready, it’s time to give our truffles their mummy look!
First, coat the Oreo balls completely with the melted white chocolate. Let the excess drip off, and then place them back on the lined sheet pan.

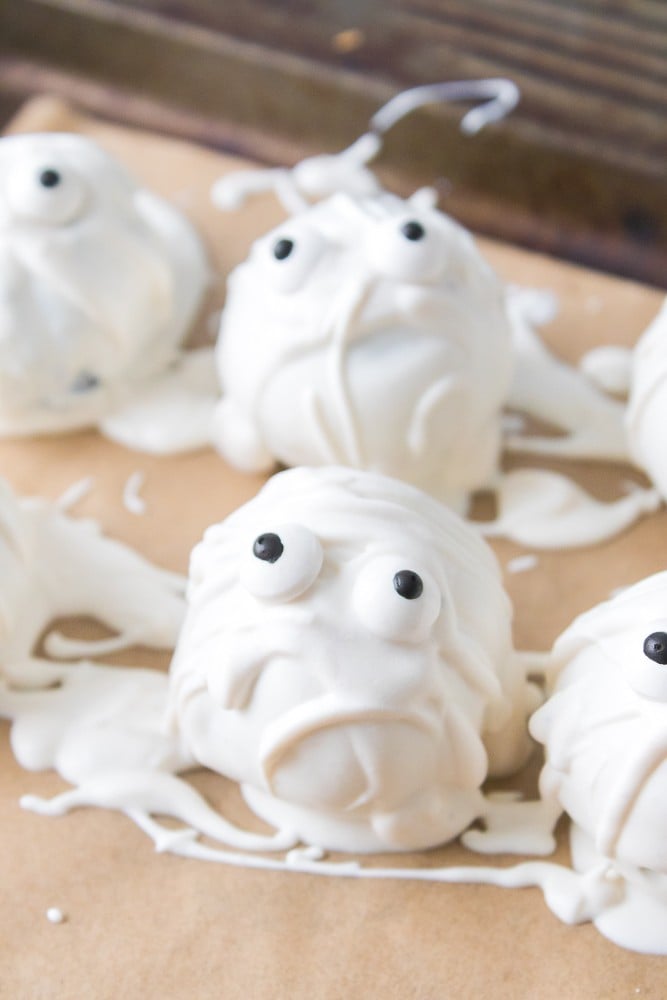
For the mummy-wrapping effect, put the remaining melted white chocolate into a ziplock bag. Snip off a corner, and carefully drizzle it across the coated Oreo balls. This will create the bandage-like appearance that makes these truffles so adorable for Halloween.

To complete the look, add mini chocolate chips, M&Ms, or another suitable candy for the mummy eye effect.
There you have it! The versatile Mummy Oreo Truffles are ready to be enjoyed at your Halloween party or as a fun, spooky treat with family and friends.
Decoration Tips
When it comes to making spooky and festive Mummy Oreo Truffles, I always enjoy getting creative with the decorations. Since these are no-bake treats, it’s easy to spend more time making them look extra scary for Halloween celebrations!
- Embrace No-Bake Treats: Take advantage of the easy no-bake nature of Mummy Oreo Truffles to spend more time on decorations.
- Add Candy Eyeballs or Eyes: Attach these with melted chocolate to the truffles for a mummy-like, creepy appearance.
- Drizzle with White Chocolate or Almond Bark: Use it to create a bandaged mummy effect. Ensure it’s melted properly and placed in a piping or plastic bag for easy drizzling.
- Experiment with Food Coloring: Enhance your decoration by tinting white chocolate with orange or green for a festive touch, or use colored frosting like a mixture of red food coloring and white frosting for a bloody effect.
- Creative Arrangement on a Platter: Lay out truffles on “spiderwebs” made from cotton candy. Add small plastic spiders and other Halloween-themed accessories for a spooktacular presentation.
- Focus on Fun and Imagination: Let your imagination run wild, and have fun while decorating. It’s the key to creating standout Mummy Oreo Truffles for any Halloween event.
Remembering to have fun and letting your creativity shine are indeed the crucial parts of successfully decorating your Mummy Oreo Truffles.

How to Store Mummy Oreo Truffles
Mummy Oreo Truffles are a delightful treat that can be stored and served easily.
When it comes to storage, I place my truffles in an airtight container before storing them in the refrigerator. This helps preserve the freshness and flavor while minimizing the risk of undesirable odors from other foods sneaking in. When stored this way, my Mummy Oreo Truffles can last for up to three weeks in the fridge.
To store the truffles for a longer period, transfer them to a freezer-safe airtight container and pop them in the freezer for up to two months. Just be sure to give the truffles enough time to defrost before serving, so that everyone can savor the delightful texture and flavor.
As long as you store them properly and serve them with love, I’m confident that you and your family or friends will enjoy these delicious and easy-to-make treats.
Tips and Tricks
Here are some friendly tips and tricks to make these scrumptious Mummy Oreo Truffles an easy and fun Halloween treat. They are perfect for Halloween parties and a fall favorite among kids and adults alike!
- Use a Food Processor for Oreos: Achieve a uniform and wet sand-like consistency by using a food processor. Alternatively, use a rolling pin and a ziplock bag if a food processor is unavailable.
- Opt for Softened Cream Cheese: For a smoother mixing process, use softened cream cheese. It blends effortlessly with crushed Oreos, creating the perfect truffle mixture.
- Chill the Truffle Balls: Place them in the fridge for about 30 minutes after combining the Oreos and cream cheese. Once they are chilled, roll them into balls. This helps maintain their shape when coating them in white chocolate.
- Work Quickly While Decorating: Completely submerge the Oreo balls in white chocolate and use a fork to lift them out. Allow the excess to drip back into the bowl for a smooth and even coating.
- Experiment with Oreo Flavors: For added creativity and festive spirit, use different Oreo flavors, like pumpkin spice, as the base.
- Involve Kids in Decorating: Let kids have fun by adding mini chocolate chips for the eyes. Use a piping bag to create “mummy wraps” with white chocolate.
These tips aim to make the process of making these scrumptious Mummy Oreo Truffles enjoyable. The result is sure to delight your Halloween guests!
Frequently Asked Questions
What is the shelf life of Oreo truffles?
The shelf life of Oreo truffles depends on how they’re stored. When refrigerated in an airtight container, they can last up to 3 weeks. However, if you want to freeze them, you can extend their shelf life up to a couple of months.
Can you store Oreo truffles at room temperature?
Due to the cream cheese, do not store Oreo truffles at room temperature. The truffles will become soft and difficult to handle. For best results, keep them refrigerated in an airtight container to prolong their freshness and maintain their texture.
How to avoid oily Oreo truffles?
To avoid oily Oreo truffles, use softened cream cheese instead of melted or over-softened cream cheese when making the mixture. Additionally, don’t overprocess the Oreos in the food processor. Aim for a wet sand-like texture rather than a smooth paste. This will prevent oils from releasing during mixing and rolling.
Here is an article of Common Truffle Mistakes and how to fix them.

Mummy Oreo Truffles
Ingredients
- 35 Oreo Cookies
- 1 package (8 oz) Cream Cheese, at room temperature
- 1 package White Candy Melts, White Chocolate Chips, or Almond Bark
- 36 Candy Eyes
Instructions
- Begin by pulverizing 35 Oreo cookies in a food processor or blender until a fine crumb consistency is achieved.
- Add room-temperature cream cheese to the Oreo crumbs and blend until the mixture is uniform and well-incorporated.
- Using a cookie scoop, form the mixture into truffles and place them on a baking sheet lined with parchment paper. Freeze the truffles for 10-15 minutes to firm up, which will make them easier to handle.
- While the truffles are firming up in the freezer, melt your chosen white candy melts, white chocolate chips, or almond bark in a suitable vessel, ensuring a smooth, lump-free consistency.
- Once the truffles are firm, use a fork to dip and completely coat each truffle with the melted mixture, placing them back on the parchment paper.
- After coating, immediately drizzle additional melted mixture over the truffles, creating lines on the top and sides to resemble mummy wraps. While the coating is still wet, gently press candy eyes onto each truffle.
- Allow the truffles to sit until the outer coating and decorative elements have solidified completely. Once set, your Mummy Oreo Truffles are ready to be served, offering a spooky and delightful treat to your guests!


